Full Stack Development Series Part 4: Data Persistence with TypeORM and NestJS

Welcome back! In part 4 of this series, we'll tackle the final component of the "full stack": data stores. I use "data store" instead of "database" because the persistence layer could be anything from a local JSON file to a DynamoDB in AWS. This post will focus on SQLite as our data store; it makes getting up and running incredibly easy, and thanks to TypeORM nothing will need to be updated when we switch databases.
If you're not familiar with it already, I highly recommend reading through The 12 Factor App. It lays out excellent guidelines for full-stack application architecture, making migrating to a "cloud native" app seamless. We already conform to the first 2 principles ("Codebase" is versioned with git, and "Dependencies" are declared in package.json), so this post will focus on both "Config" and "Backing Services".
Other posts in this series:
- An Introduction
- Part 1: Getting Started With Nx, Angular, and NestJS
- Part 2: Creating a REST API
- Part 3: Connecting Angular to a REST API
- Part 4: Data Persistence with TypeORM and NestJS (this post)
If you want to skip ahead to the code, you can checkout out the repository: wgd3/full-stack-todo@part-04
The Persistence Layer
As mentioned in the introduction, we'll use TypeORM and SQLite for our data store. When developing locally SQLite uses a single file for the database, and it gets queried just like any other SQL-based database. This means that even if we weren't using TypeORM to abstract some of the SQL code, we could swap SQLite for PostgreSQL or MariaDB and not have to change our codebase.
Before we dive into entities, schemas, and repositories, I'm going to introduce NestJS' ConfigModule. By setting this up first, we'll have a flexible platform for configuring whatever database (and the rest of the application) we want.
But First - Configuration
NestJS offers a large number of libraries that can be added to projects, and this one is used in every application I write: Configuration. The short version is that ConfigModule allows you to use environment variables in your application, as well as configuration validation. Let's dive in!
$ npm i --save @nestjs/config joi

$ touch .env
joi is not required, but it provides some additional validation as you'll see later. In the environment file we'll define connection details for SQLite:
DATABASE_TYPE=sqlite
DATABASE_NAME=full-stack-todo
DATABASE_PATH=tmp/development.sqlite

# these variables aren't needed when using SQLite, but I keep them around for future use
DATABASE_HOST=
DATABASE_PORT=
DATABASE_USERNAME=
DATABASE_PASSWORD=
With that in place we can initialize the module at the root of our application. Note that isGlobal is set here so that ConfigModule does not need to be initialized in every child module that needs ConfigService available.
@Module({
  imports: [
    ConfigModule.forRoot({
      isGlobal: true,
      validationSchema: Joi.object({
        DATABASE_PATH: Joi.string().default('tmp/db.sqlite'),
      }),
    }),
    ...
  ]
}) Database Time
There are a few packages needed in order to work with a database:
$ npm install --save @nestjs/typeorm typeorm mysql2 sqlite3 mysql2 won't be used initially, but I'm keeping it for future useUpdate AppModule once more to set up the TypeORM module with (validated!) config options:
@Module({
  imports: [
    ConfigModule.forRoot({
      isGlobal: true,
      validationSchema: Joi.object({
        DATABASE_PATH: Joi.string().default('tmp/db.sqlite'),
      }),
    }),
    TypeOrmModule.forRootAsync({
      useFactory: (config: ConfigService) => ({
        type: 'sqlite',
        database: config.get('DATABASE_PATH'),
        synchronize: true,
        logging: true,
        autoLoadEntities: true
      }),
      inject: [ConfigService],
    }),
    ...
  ],
  ...
})autoLoadEntities caused a small issue for me, scroll down to Speed Bumps to read about that.Creating A Data Access Library
Our repository has a few types of libraries already, but none of them are the right place to store persistence-related code. Nx provides some guidance on this situation, so with that in mind it's time for the first Data Access library in the repository:
$ npx nx generate @nrwl/nest:library DataAccessTodo \
> --directory=server \
> --importPath=@fst/server/data-access-todo \
> --strict \
> --tags=type:data-access,scope:servertype:data-access will help establish library boundaries, such as preventing a util library from importing database code. You'll see that the @nrwl/nest:library automatically added a module for us. The end goal with this library is for a Feature library to have a single import from @fst/server/data-access-todo, which in turn provides database providers. In my opinion we can go a step farther and add a module dedicated to our database persistence. I like to keep my codebase flexible, and if we wanted to implement alternative persistence layers (flat file, cloud blob storage, etc) then each could have their own module/directory.
$ npx nx generate @nrwl/nest:module Database \
> --project=server-data-access-todo \
> --directory=lib
Next, we'll need a place to define our first database "model":
$ mkdir -p libs/server/data-access-todo/src/lib/database/schemas

$ touch libs/server/data-access-todo/src/lib/database/schemas/to-do.entity-schema.ts
There are a couple ways to define models, and I usually lean towards classes with decorators. That code can become hard to read however, so I opted to use the schema-based method for this post.
import { EntitySchema } from 'typeorm';

export const ToDoEntitySchema = new EntitySchema<ITodo>({
  name: 'todo',
  columns: {
    id: {
      type: 'uuid',
      primary: true,
      generated: true,
    },
    title: {
      type: String,
      nullable: false,
    },
    description: {
      type: String,
      nullable: true,
    },
    completed: {
      type: 'boolean',
      default: false,
      nullable: false,
    },
  },
});completed column to datetime type instead of boolean. I'm not sure why that happened, and it's still in the codebase at this tag, but I've updated it here just in case.generated property momentarily got in my way, which I've summarized in the Speed Bumps section of this post below. In the very first line you can see how we're using the shared data structure ITodo to enforce the schema's properties! Another great example of shared libraries keeping things in check.
Since this is an independent module, TypeOrmModule will get called with forFeature() instead of forRoot() - a common pattern for NestJS modules. Our new schema will be imported here to ensure it's metadata is registered when the app is initialized.
@Module({
  imports: [TypeOrmModule.forFeature([ToDoEntitySchema])],
  exports: [TypeOrmModule],
})
export class DatabaseModule {}TypeOrmModule exported? From NestJS docs: "If you want to use the repository outside of the module which imports TypeOrmModule.forFeature, you'll need to re-export the providers generated by it."ServerDataAccessTodoModule will need to be updated to export the above DatabaseModule as well:
@Module({
  imports: [DatabaseModule],
  controllers: [],
  providers: [],
  exports: [DatabaseModule],
})
export class ServerDataAccessTodoModule {}Interacting With The Database
Finally, we'll get to use the database instead of just setting it up. We're going to update our ServerFeatureTodoService to use a database connection instead of the BehaviorSubject we've used so far.
@Module({
  imports: [ServerDataAccessTodoModule],
  ...
})
export class ServerFeatureTodoModule {}export * from './lib/database/schemas/to-do.entity-schema';
...

  constructor(
    @InjectRepository(ToDoEntitySchema)
    private todoRepository: Repository<ITodo>
  ) {}

  async getAll(): Promise<ITodo[]> {
    return await this.todoRepository.find();
  }

...I've opted to use the Repository Pattern and make use of the InjectRepository decorator here instead of relying on TypeORM's QueryRunner. The former provides easy, intuitive access to the type of queries you'd normally see in a SQL transaction. The latter provides greater control over queries, and can be more powerful.
There are some major changes when switching from an in-memory storage solution to a database-based persistence layer:
- TypeORM returns Promises instead of plain objects like we've used so far. Our code will need to be updated so that return signatures are correct, and async / await is used properly.
- We no longer need to rely on Javascript's
Math.random()for assigning IDs; TypeORM will generate a UUID for each to-do automatically. - TypeORM provides methods which will handle transaction failures for you. For example, we could update the services'
getOnemethod to use TypeORM'sgetOneOrFailand not worry about checking forundefined. In this specific example, I chose not to go that route so that I could use NestJS'NotFoundException
Here's a glimpse at the result of these changes:
async getOne(id: string): Promise<ITodo> {
// const todo = this.todos$$.value.find((td) => td.id === id);
const todo = await this.todoRepository.findOneBy({id});
if (!todo) {
throw new NotFoundException(`To-do could not be found!`);
}
return todo;
}
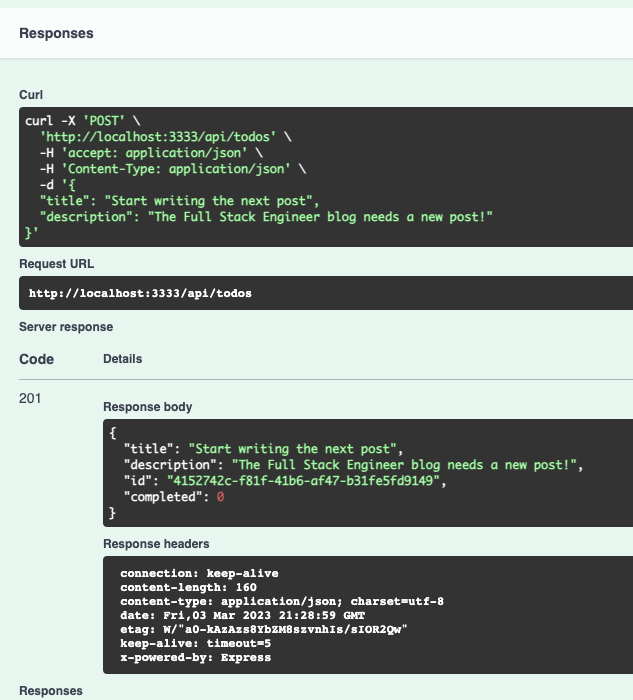
async create(todo: Pick<ITodo, 'title' | 'description'>): Promise<ITodo> {
// const current = this.todos$$.value;
// const newTodo: ITodo = {
// ...todo,
// id: `todo-${Math.floor(Math.random() * 10000)}`,
// completed: false,
// };
// this.todos$$.next([...current, newTodo]);
const newTodo = await this.todoRepository.save({...todo})
return newTodo;
} BehaviorSubject storage has simply been commented out, not removed, for comparison's sake as of this commit. Future commits will remove the code to clean up the source files.Edit: dep-graph to the rescue!
After this post was published, I discovered a minor mistake in the repository thanks to Nx's dep-graph tool; I had imported the ServerDataAccessTodoModule into the API's app.module.ts. Due to the structure of our libraries, this shouldn't be necessary at all - only the features that require those providers should import the data access module. Once I removed the import from AppModule I verified that everything still worked, and checked the dependency graph a second time. Here are the before/after pictures:
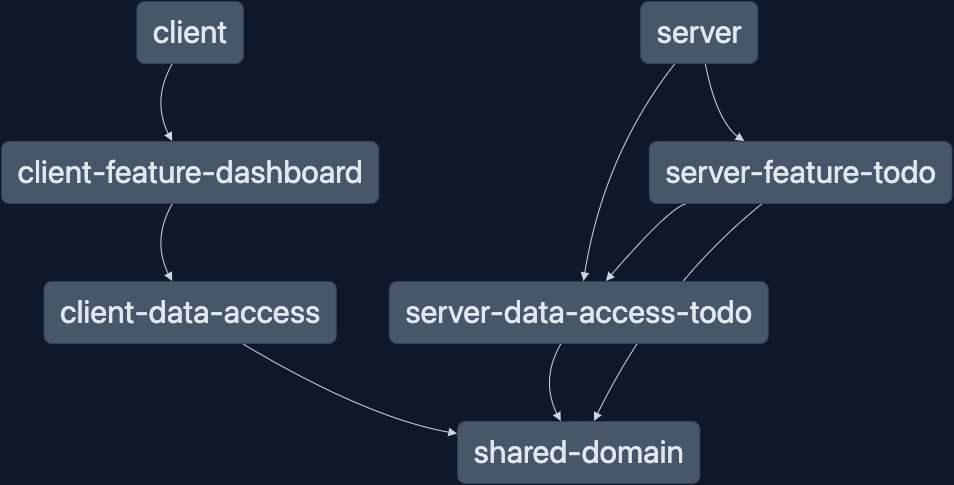
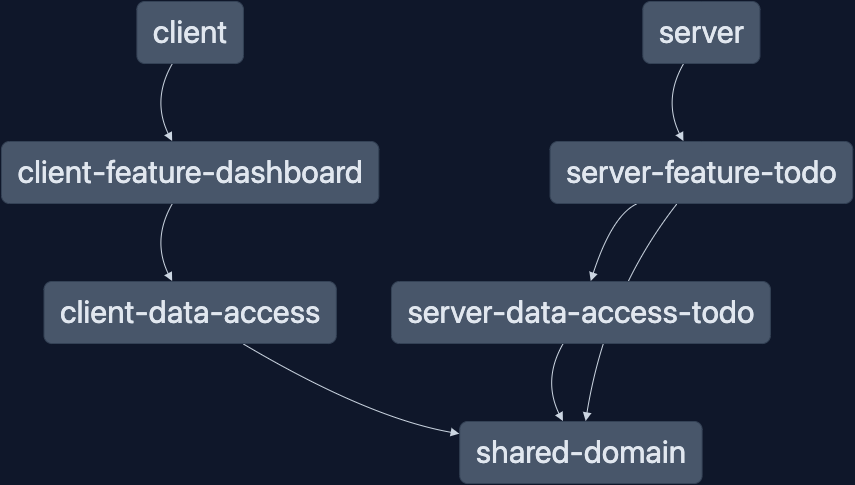
With the proper library hierarchy re-established (visually, at least), I decided to run nx lint against all the projects to double-check that all the boundaries were still respected.
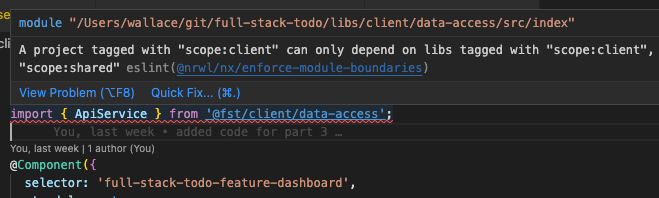
Sure enough, I forgot to update project.json for the data-access library on the client side.
...
  "tags": [
    "scope:client",
    "type:data-access"
  ]
...After that, not only did nx lint pass with flying colors, it used the cached output from the last nx lint run to skip the libraries unaffected by this change!
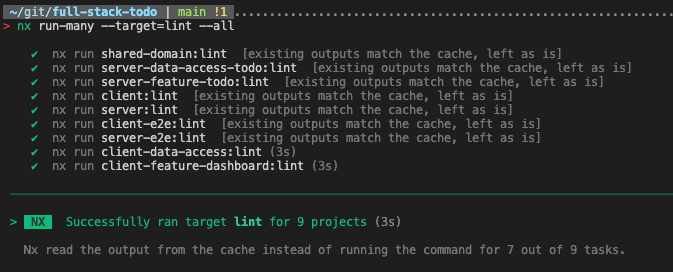
The cached results dropped the run time for nx lint from 8 seconds to 3 seconds. Although this savings is just 5 seconds, it's still over twice as fast. Those seconds add up, and in larger monorepos you can see how this would save a lot of time.
Bonus Content: Adding Swagger
With a persistence layer fully implemented, I found myself using the command line to test and make sure that everything worked as expected. This worked well, but after a while the repitition got to me and I wanted a UI instead. Thanks to the OpenAPI project, there's a library available for just that!
$ npm install --save @nestjs/swaggerSo far we've seen external modules added to the AppModule, however for this library we need to initialize everything during the bootstrap phase of the application.
  // set up versioning
  app.enableVersioning({
    type: VersioningType.URI,
    prefix: 'v1',
  });

  // handle swagger
  const config = new DocumentBuilder()
    .setTitle(`Full Stack To-Do REST API`)
    .setVersion('1.0')
    .build();
  const document = SwaggerModule.createDocument(app, config);
SwaggerModule.setup('api/v1', app, document);/api/v1 as the prefix instead of just /api.Now when the server app starts up, you'll be able to access the Swagger page at http://localhost:3333/api/v1
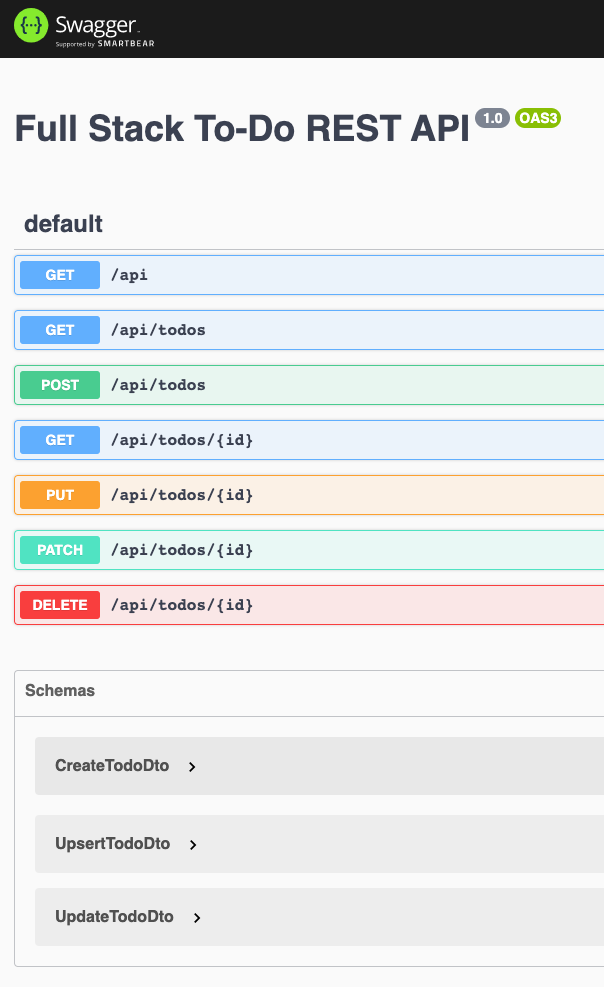
At the bottom of the page you'll notice the "Schemas" that are already registered. This is because we used classes as the type for @Body() properties in the controller's methods. Swagger automatically picked up on those, but doesn't yet know about the properties of these classes. In order to fully document the DTOs we'll need to decorate any properties we'd like exposed:
export class CreateTodoDto implements ICreateTodo {
  @ApiProperty({
    type: String,
    example: `Create a new blog post`,
    required: true,
  })
  @IsString()
  @IsNotEmpty()
  title!: string;

  @ApiProperty({
    type: String,
    example: `The Full Stack Engineer blog needs a new post!`,
    required: true,
  })
  @IsString()
  @IsNotEmpty()
  description!: string;
}@ApiProperty comes from the @nestjs/swagger package, but the other decorators come from the class-validator package that was installed in a previous post.There are many decorators available to us, and the next one we need will be used for our controller's routes. While the controller is being updated, we should also update the return signature to reflect the Promises from TypeORM.
  @Get('')
  @ApiOkResponse({
    type: TodoDto,
    isArray: true,
  })
  @ApiOperation({
    summary: 'Returns all to-do items',
    tags: ['todos'],
  })
  async getAll(): Promise<ITodo[]> {
    return this.serverFeatureTodoService.getAll();
}Like @ApiOkResponse there are options for most HTTP status codes. I would usually provides types for bad requests as well, but error handling in general will be covered in a future post. For now, explore the Swagger page and enjoy the new method of interacting with your to-do list!
All code up to this point is available in the GitHub repository as always: wgd3/full-stack-todo@part-04
Speed Bumps
Here are a few things I came across while writing this post:
EntityMetadataNotFoundError- I initially left out the configuration optionautoLoadEntities: truefrom TypeORM'sforRoot()method. Without it, no metadata for our entity (a well named error) was ever registered.- I mistakingly set
generatedtotruein the schema for the database entity. When I tried to run the application I got this error:SQLITE_ERROR: AUTOINCREMENT is only allowed on an INTEGER PRIMARY KEY. Since these to-do items use a UUID instead of a numeric primary keygeneratedneeded to be set to'uuid' - The
.envbeing used here does contain aDATABASE_TYPEvariable. However, the config being passed to the TypeORM module'sforRoot()method complains when the value is not defined explicitly. I haven't found a workaround for this yet, so I hard-codedsqlite