Full Stack Development Series Part 6: Application Deployment and CI/CD
Learn how to deploy applications from an Nx monorepo, how to Dockerize your application, and use GitHub Actions for CI/CD
Welcome back! In my previous posts I demonstrated how to create multiple apps in a single repository - but now it's time to get the apps up and running. When I started my career as a developer I wasn't using Docker, Kubernetes was gibberish to me, and Heroku still had a free tier. Since then I've gained a passion for self-hosting in my home lab, and have spent a fair amount of time learning how to deploy apps in my local Kubernetes environment. As a result, even this blog is hosted in my office. In this post I'd like to share my experience with Docker containers, CI/CD, and hosting applications in various "clouds".
This is a big one, so don't hesitate to jump around and just read the parts that interest you the most. I learned a ton just from summarizing all this and I hope you do as well!
Other posts in this series:
- An Introduction
- Part 1: Getting Started With Nx, Angular, and NestJS
- Part 2: Creating a REST API
- Part 3: Connecting Angular to a REST API
- Part 4: Data Persistence with TypeORM and NestJS
- Part 5: Design Systems and Angular Component Development with Storybook
- Part 6: Application Deployment and CI/CD (this post)
If you want to skip ahead to the code, you can checkout out the repository: wgd3/full-stack-todo@part-06
Preface
Before we dive too far, I want to clarify a subtlety that may not be immediately apparent: the demonstration I'm providing here is for deploying applications via Docker containers - not developing applications in a container. In some cases, it makes sense to develop in a container; you don't need to worry about dependencies conflicting with packages on your local machine. That's not standard practice for me however, so I'm relaying what I've learned over the years.
This post assumes some basic knowledge of Docker (Docker 101). It does not, however, require knowledge of Kubernetes. I've included a k8s deployment overview for those who are interested, but it can be ignored otherwise.
Adding Health Checks to the API
An oft-overlooked element of application deployments, regardless of the hosting provider, is the health of an application. That is to say: how can the hosting environment determine that an application is functioning normally. For APIs, this generally comes in the form of an endpoint that returns a 200 OK, possibly with a payload describing it's dependencies. To this end, we're going to start by utilizing the @nestjs/terminus package and exposing a health endpoint in our API.
$ npm i --save @nestjs/terminus

$ npx nx generate @nrwl/nest:library FeatureHealth \
--controller \
--directory=libs/server \
--importPath=@fst/server/feature-health \
--strict \
--tags=type:feature,scope:server
This feature library was created the same way our server-feature-todo library was, nothing special about it. Once your library has been created, make sure that your AppModule is updated to import the ServerFeatureHealthModule:
@Module({
  imports: [
    ...
    ServerFeatureHealthModule
    ],
  controllers: [],
  providers: [],
})
export class AppModule {}Our new endpoint doesn't need to be versioned like the rest of our REST endpoints, so you can leave out the version: '1' property in the controller's decorator:
@ApiTags('health')
@Controller({ path: 'health' })
export class ServerFeatureHealthController {
  constructor(
    private health: HealthCheckService,
    private db: TypeOrmHealthIndicator
  ) {}

  @Get()
  @HealthCheck()
  healthcheck() {
    return this.health.check([() => this.db.pingCheck('database')]);
  }
}The above code will return a detailed payload when queried:
{
   "details" : {
      "database" : {
         "status" : "up"
      }
   },
   "error" : {},
   "info" : {
      "database" : {
         "status" : "up"
      }
   },
   "status" : "ok"
}
There's not much to this controller, other than the TypeOrmHealthIndicator. If we had concerns about our hosting environment NestJS has additional indicators that can report on it's hosts' hardware, but that isn't the case here.
Creating a Shared Environment Library
Since this guide discusses multiple environment types, it's time to introduce dynamic environment variables that can be shared by all libraries and applications. The following steps will create a shared IEnvironment interface that both application can reference, and instruct our application compilers to use specific files for specific environments.
To start, let's create the second shared library:
$ npx nx generate @nrwl/node:library util-env \
--directory=libs/shared \
--importPath=@fst/shared/util-env \
--simpleModuleName \
--strict \
--tags=type:util,scope:shared \
--unitTestRunner=none
I explicitly declared unitTestRunner: none since this library won't contain any code that needs to be tested. Now - how do we utilize different environment files for different environments? The answer lies in each application's project.json file:
{
  "targets": {
    ...
    "build": {
      "configurations": {
        ...
        "render": {
           ...
           "fileReplacements": [
              {
                "replace": "libs/shared/util-env/src/lib/environment.ts",
                "with": "libs/shared/util-env/src/lib/environment.render.ts"
              }
            ]
          },
        },
    },
    "serve": {
      "executor": "@angular-devkit/build-angular:dev-server",
      "configurations": {
        ...
        "render": {
          "browserTarget": "client:build:render"
        }
},project.json reflected these. There is a new generator for those that need the old-style environment files back. Our guide takes a different approach utilizing the shared library.Under the target > build > configurations section you can add any arbitrary environment definition. Here I've added render as we'll eventually deploy to their cloud. If you ran the command nx build client:render the compiler would swap out environment.ts for environment.render.ts (but maintain the environment.ts name so imports work) and use those values.
$ tree libs/shared/util-env/src/lib
libs/shared/util-env/src/lib
    # used for local dev
├── environment.development.ts
    # defines what variables should be present in any env file
├── environment.interface.ts
    # not currently used, but available depending on what you consider "production"
├── environment.production.ts
    # Render.io-specific configuration
├── environment.render.ts
    # fileReplacements needs a standard file to point to, so this contains default values and gets replaced at build time
└── environment.tsimport { IEnvironment } from './environment.interface';
export const environment: IEnvironment = {
production: true,
apiUrl: 'https://fst-demo-server.onrender.com/api/v1',
};
One small, related change to the code base - we need to address CORS policies before deploying! For Render specifically, the API and the front end are served from 2 different URLs, and without CORS policies defined the two domains will not be able to communicate. This is not the most secure way to handle this, but for now we'll allow any origin:
  // TODO - revisit and secure this!
  app.enableCors({
    origin: '*',
});Deployment with Docker
On to the fun stuff! As I mentioned at the top of this post, I'm assuming that you already have some familiarity with Docker - what an image is, how they're built, etc. Conveniently, Nx provides a built-in generator for integrating Docker into an application in our repository. I used the following commands to set that integration up and test it out:
$ npx nx generate @nrwl/node:setup-docker --project=client

$ npx nx generate @nrwl/node:setup-docker --project=server

$ npx nx run-many --target=docker-build --all
The default Dockerfile generated for each app work, but we need to do some heavy modification so they best align with the type of application they're hosting.
Important to note here: these Dockerfiles assume you already have the correctly built version of the application compiled in dist/apps/* - it will fail if the compiled code is not available! There will be an alternate Dockerfile in the Render section that does not require building beforehand.
Angular Dockerfiles
These are easy to set up - once the project has been compiled all of it's assets are available for hosting under the dist/apps/client folder. Nginx has an image which makes it very easy to serve these assets:
FROM docker.io/nginx:stable-alpine

COPY dist/apps/client /usr/share/nginx/html
COPY apps/client/nginx.conf  /etc/nginx/conf.d/default.conf

EXPOSE 80

CMD ["nginx", "-g", "daemon off;"]The client application folder also contains an nginx.conf file which intercepts and redirects browser requests for /api to an "upstream" server - our API. This skirts the CORS issue slightly, and this configuration is something that I plan on revisiting very soon.
nginx.conf file that is passed to the client image has a hard-coded value for the API redirect: proxy_pass http://server:3333;Thanks to Docker's internal DNS we can direct HTTP traffic to the container named
server. If that service's name is ever changed in the docker-compose.yml file, this will break! This bit me in the butt while I was writing, I did my Kubernetes experimentation a week after the Dockerfiles, and completely forgot about this limitation. See Speed Bumps for more information.
NestJS Dockerfiles
These are a little bit more difficult: In order for Node to run the compiled main.js file, the node_modules folder with our project's dependencies in it needs to be available. To further complicate matters, all the dependencies for the entire repository - client and server and their libraries - exist in the root package.json. This is by design, but makes for a very bloated image (my experiments showed ~170MB for client and ~350MB for server).
For the NestJS application, our Dockerfile will utilize multi-stage builds. The first stage will be responsible for installing all the dependencies needed, and the second is responsible for using those packages to run the application:
# builder stage named "deps"
FROM docker.io/node:lts-alpine as deps

COPY dist/apps/server/package*.json ./

# install extracted deps
RUN npm install --only=production

# install additional deps
RUN npm install reflect-metadata tslib rxjs sqlite3 mysql2 pg

# runner stage
FROM docker.io/node:lts-alpine as runner

# pull in packages from builder stage
COPY --from=deps /usr/src/app/node_modules ./node_modules
COPY --from=deps /usr/src/app/package.json ./package.json

# copy local, compiled app
COPY dist/apps/server .
RUN chown -R node:node .
USER node

CMD ["dumb-init", "node", "main.js"]There is some magic behind the scenes here: you can tell webpack (used for compiling NestJS) to output a package.json file during compilation that lists only what the application needs! Sounds perfect, right? Well.. not so much. Nx and Webpack use Nx's dependency tree to identify which libraries need which packages, and assemble the package.json from that data. This grabs most packages, but not all of them. The second npm install in the above file takes care of the packages not commonly found by Webpack.
With our updated Dockerfiles we can now run build again and get fully functional images:
# because 'docker-build' depends on the 'build' run target, the apps will get re-built before the images are actually built
$ npx nx run-many --target=docker-build --all

$ docker images | egrep -e 'client' -e 'server'
server                                                    latest                                                  ce8a2cad0848   18 seconds ago   472MB
client                                                    latest                                                  73500976bc36   54 seconds ago   22.6MB

# run the API
$ docker run -it --rm \
-e DATABASE_TYPE=sqlite \
-e DATABASE_NAME=db.sqlite \
-p 3333:3333 \
--name server
server

# test the health route - see how useful it is?
$ http localhost:3333/api/health
HTTP/1.1 200 OK
Docker Compose
So you have a couple of Docker images freshly created. You're ready to deploy "the stack" so to say. Well you could certainly run each image manually from your terminal, passing in environmental vars and such each time. Or.. you could declaratively define what the "stack" should look like when running as a group! That's where docker-compose comes in: you create a single docker-compose.yml file with all the "services" (images) you want, configured how you want, and a single command can control the whole stack. If you'd like a tutorial, Docker themselves have a great overview: Try Docker Compose.
I'm going to present 2 variants of the compose file: the first showcasing the barebones necessary to get started. Other compose files will contain some more advanced configurations, and include other containers in the stack!
If you don't have one already, you should copy the sample .env file from the repository root, rename it .env, and fill it out accordingly. That file is read whenever you run docker-compose in the same directory and will inform the details for our services.
Beginner Level
All that's needed for a bare-bones start is your two "services":
version: '3.8'

services:

  # Angular front end
  client:
    image: client
    ports:
      - 8080:80

  # NestJS backend
  server:
    image: server
    ports:
      - 3333:3333
    # pass in current environment file
    env_file:
- .env# with the file in place, this is all that's needed to start "the stack"
$ docker-compose up
# optionally pass -d so the services run in background
$ docker-compose up -dIt's this simple. The two image: properties refer to the local images that were created when we ran docker-build in the previous section, they aren't being pulling from a remote registry. And unless your .env file specifies an external database that you already have established, the server service should fallback to a local SQLite database. This database will only last as long as the container - it's not persistent!
Advanced Level
docker-compose makes life so much easier. But wait, there's more! Let's add some properties to ensure the following:
clientonly runs if the API container starts successfullyclientwill report "healthy" instead of "running" via a health checkserverwill also report "healthy" based on it's API health routeserverhas theENVIRONMENTvariable hard coded. This allows the same.envfile to be used during development without having to redefineENVIRONMENT
version: '3.8'

services:
  client:
  	# explicit names make it easier to reference containers
    container_name: client
    image: client
    ports:
      - 8080:80

    # ensures an API is available
    depends_on:
      - server

    # nginx's default image is based on debian, so we can use
    # 'service' to check the health of the process instead of
    # curl/wget against localhost
    healthcheck:
      test: service nginx status || exit 1
      interval: 15s
      timeout: 5s
      retries: 3

  server:
    container_name: server
    image: server
    ports:
      - 3333:3333
    env_file:
      - .env

    # override the ENVIRONMENT variable set in the file
    environment:
      - ENVIRONMENT=docker

    # node's alpine image doesn't bundle curl by default, so
    # we use wget to query a basic GET endpoint
    healthcheck:
      test: wget localhost:3333/api/v1/todos -q -O - > /dev/null 2>&1
      interval: 10s
      timeout: 5s
      retries: 3
      start_period: 30s
Additional Services - PostgreSQL
What about persistent storage? If you recall from the previous post, a huge perk to using TypeORM as our database interface is that we can use (almost) whatever database we want! Let's start with PostgreSQL running as it's own service:
  # add dependency to 'server' service so it waits for a healthy database - not just a "started" state
  server:
  	...
    depends_on:
      postgres:
        condition: service_health

  postgres:
    container_name: postgres
    image: postgres:alpine
    ports:
      - 5432:5432
    # explicitly set because the .env variable names don't match
    # what is expected in the container
    environment:
      - POSTGRES_USER=${DATABASE_USERNAME}
      - POSTGRES_PASSWORD=${DATABASE_PASSWORD}
      - POSTGRES_DB=${DATABASE_NAME}
    healthcheck:
      test: ["CMD-SHELL",  "su -c 'pg_isready -U postgres' postgres"]
      interval: 30s
      timeout: 5s
      retries: 3
One small data "gotcha": the above does not really accomplish persistent storage - we do not pass any volumes to the postgres service on which to store long term data. The data stored in postgres will only live as long as the service itself. If you wish to run this application locally, I recommend defining a volume mount for this service.
Additional Services - MariaDB
Similar to the above, you could substitute MariaDB for Postgres (don't run both at once, only 1 will be used!).
# add dependency to 'server' service so it waits for a healthy database
  server:
  	...
    depends_on:
      mariadb:
        condition: service_health

  mariadb:
    container_name: mariadb
    image: mariadb:latest
    ports:
      - 3306:3306
    environment:
      - MYSQL_USER=${DATABASE_USERNAME}
      - MYSQL_PASSWORD=${DATABASE_PASSWORD}
      - MYSQL_DATABASE=${DATABASE_NAME}
      - MYSQL_ROOT_PASSWORD=${DATABASE_PASSWORD}
    healthcheck:
      test: ["CMD", "mysqladmin", "ping", "-h", "localhost", "--password=$DATABASE_PASSWORD"]
      interval: 30s
      timeout: 5s
      retries: 5
start_period: 10sdepends_on value for server has changed to match the name of our mariadb service.Additional Services - Swagger UI
This is a bit excessive, but I found this service used in another project's docker-compose.yml file and thought it would be fun to include. This image simply provides a way to host your Swagger docs outside of your API application. I updated my main.ts file to specify the JSON file path, and used that for the container:
  SwaggerModule.setup('api/v1', app, document, {
    jsonDocumentUrl: 'api/v1/swagger.json',
}); swagger-ui:
container_name: swagger
image: "swaggerapi/swagger-ui:v3.25.0"
ports:
- "8080:8080"
volumes:
- ./${SWAGGER_JSON_FILE}:/usr/share/spec/${SWAGGER_JSON_FILE}
environment:
SWAGGER_JSON: /usr/share/spec/${SWAGGER_JSON_FILE}
healthcheck:
test: ["CMD", "wget", "localhost:8080 -q -O - > /dev/null 2>&1"]
interval: 30s
timeout: 10s
retries: 5Deployment with Kubernetes
Kubernetes (k8s going forward) is a beast of a tool. As I mentioned in the introduction for this post, I won't be going over setting up a k8s environment. But if you have one at your disposal and want to see how our application stack might be used, I've included the k8s directory in the repository.
I started by setting up the Kompose tool, and used it to convert docker-compose.yml to individual manifest files. You can see that each "service" defined in docker-compose.yml gets at least 2 files: -deployment.yaml (the actual application) and -service.yaml (a k8s service that exposes the application outside of the cluster).
$  kompose convert --with-kompose-annotation=false --out ./k8s

$  tree k8s
k8s
├── client-deployment.yaml
├── client-service.yaml
├── env-configmap.yaml
├── full-stack-todo-default-networkpolicy.yaml
├── mariadb-deployment.yaml
├── mariadb-service.yaml
├── server-deployment.yaml
├── server-service.yaml
├── swagger-ui-claim0-persistentvolumeclaim.yaml
├── swagger-ui-deployment.yaml
└── swagger-ui-service.yamlLABEL commands to DockerfilesI customized my stack before deploying it: I removed the swagger-ui files and the networkpolicy file. The latter provided a huge headache, as I forgot it was there and it prevented network access via load balancer IPs. To get ready for this application, I manually created a namespace fullstacktodo to group all the elements of this project. A few more minor changes before I created these resources:
livelinessProbewas removed from deployments- removed networkpolicy labels
- added
LoadBalancerIPs - specified the new
fullstacktodonamespace in the definition for each resource
Some Behind-The-Scenes Notes For This k8s Deployment
During the development of this content, I simply took the raw output from kompose, pushed it to a temporary, public branch, and used ArgoCD's web UI to create a new application. This first run did not include LoadBalancer IPs, so those were manually added.
My home lab k3s environment was already configured to use MetalLB for LoadBalancer IPs, and that is outside the scope of this post.
Once my edits were complete I was able to run kubectl apply -f ./k8s and everything came online!
$ kubectl get all -l 'io.kompose.service in (client, server)'
NAME                          READY   STATUS    RESTARTS   AGE
pod/client-558b74bfb7-2cp57   1/1     Running   0          3m23s
pod/server-7c699fd74-fdhbl    1/1     Running   0          3m

NAME             TYPE        CLUSTER-IP      EXTERNAL-IP   PORT(S)    AGE
service/client   ClusterIP   10.43.199.93    <none>        4200/TCP   23m
service/server   ClusterIP   10.43.150.148   <none>        3333/TCP   23m

NAME                     READY   UP-TO-DATE   AVAILABLE   AGE
deployment.apps/client   1/1     1            1           3m23s
deployment.apps/server   1/1     1            1           3m

NAME                                DESIRED   CURRENT   READY   AGE
replicaset.apps/client-558b74bfb7   1         1         1       3m23s
replicaset.apps/server-7c699fd74    1         1         1       3m
Updating services with static LoadBalancer IPs:
$ kubectl get svc -l 'io.kompose.service in (client,server)' -n fullstacktodo
NAME     TYPE           CLUSTER-IP      EXTERNAL-IP   PORT(S)          AGE
client   LoadBalancer   10.43.252.105   10.0.0.59     80:31398/TCP     21h
server   LoadBalancer   10.43.68.117    10.0.0.60     3333:31690/TCP   21h
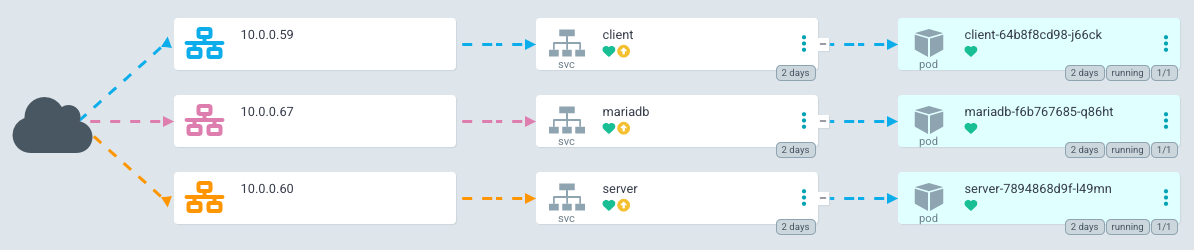
LoadBalancer IP addresses for our services# now we can call the API from the LoadBalancer IP
$ wget -qO- 10.0.0.60:3333/api/health
{"status":"ok","info":{"database":{"status":"up"}},"error":{},"details":{"database":{"status":"up"}}}
# and can see the client's HTML via it's LoadBalancer IP as well
$ wget -qO- 10.0.0.59
<!DOCTYPE html><html lang="en"><head>
<meta charset="utf-8">
<title>Client</title>
<base href="/">
<meta name="viewport" content="width=device-width, initial-scale=1">
<link rel="icon" type="image/x-icon" href="favicon.ico">
</head>
<body>
<fse-root></fse-root>
<script src="runtime.7ae29a296d479790.js" type="module"></script><script src="polyfills.4709fd955acb2242.js" type="module"></script><script src="main.e0b9e9dd89f2992a.js" type="module"></script>
</body></html>This configuration uses a fairly basic declarative way of creating our application in a Kubernetes environment. One rabbit hole that I did not go down here is the possibility of using Helm Charts instead of plain manifest files.
Deployment with Render
Render.com is a SaaS platform which offers an incredible free tier. Plus, when you connect a GitHub repo to an application, Render will re-deploy your app every time a monitored branch gets updated!
Their UI makes it easy to get started with Web Services, however I chose to take advantage of their Blueprint system and define my services with code:
services:
  - type: web
    name: fst-demo-client
    repo: https://github.com/wgd3/full-stack-todo.git
    env: docker
    plan: free
    dockerfilePath: ./apps/client/Dockerfile.render
    dockerContext: ./

  - type: web
    name: fst-demo-server
    repo: https://github.com/wgd3/full-stack-todo.git
    env: docker
    plan: free
    dockerfilePath: ./apps/server/Dockerfile.render
    dockerContext: ./

databases:
  - name: fst-demo-db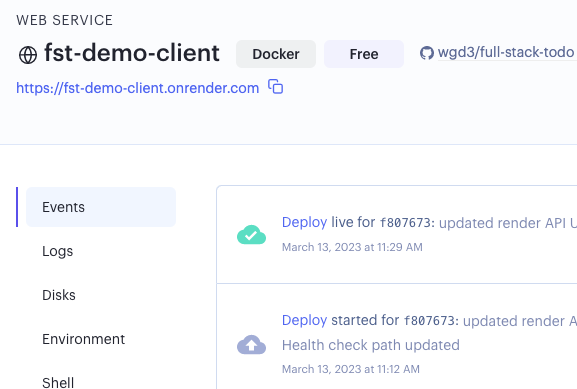
plan: freeBy adding a file named render.yaml to the root of my repository, Render can auto-detect my infrastructure and build out everything I have defined. Here's the client application hosted by Render: Client UI
fst-demo-server and fst-demo-client will need to be changed if you clone and deploy your own instance of this codebase!CI/CD with GitHub Actions
CI/CD stands for "continuous integration/continuous delivery" and inevitably becomes a part of any developer's tool box. If you've spent any time browsing through PRs on GitHub, you'll notice that there are "checks" (usually) which have to be passed before merging code. These checks are (again, usually) automated ways of linting, building, and testing your code before it gets deployed. For this project, we want to accomplish the following:
For Pull Requests:
- Test and Lint only the apps and libraries that have been updated
- Run a complete build of both applications to ensure that it can build successfully
- Analyze code coverage from the testing
For the Main Branch:
- Test, lint, and build all applications and libraries
- Create a new release/tag for the repository
For New Tags/Releases:
- Build an updated Docker image for both applications, and push them to GitHub's container repository
Nx provides a generator to get us started with a CI workflow:
$ npx nx generate @nrwl/workspace:ci-workflow --ci=githubI'm utilizing Nx's Cloud service and distributed cache, so in this workflow I left their default jobs alone. For code coverage I like using codecov.io for visualization purposes, so I added a job to upload my test results:
name: Pull Request CI

env:
  NX_CLOUD_ACCESS_TOKEN: ${{ secrets.NX_CLOUD_ACCESS_TOKEN }}
  CODECOV_TOKEN: ${{ secrets.CODECOV_TOKEN }}

# workflow for pull requests
on: pull_request

jobs:
  main:
    name: Nx Cloud - Main Job
    uses: nrwl/ci/.github/workflows/[email protected]
    with:
      number-of-agents: 3
      init-commands: |
        npx nx-cloud start-ci-run --stop-agents-after="build" --agent-count=3
      parallel-commands: |
        npx nx-cloud record -- npx nx format:check
      parallel-commands-on-agents: |
        npx nx affected --target=lint --parallel=3
        npx nx affected --target=test --parallel=3 --ci --code-coverage
        npx nx affected --target=build --parallel=3
      artifacts-path: |
        dist/
        coverage
      artifacts-name: dist-and-coverage-artifacts

  agents:
    name: Nx Cloud - Agents
    uses: nrwl/ci/.github/workflows/[email protected]
    with:
      number-of-agents: 3

  codecoverage:
    runs-on: ubuntu-latest
    name: Code Coverage
    needs: ['main']
    steps:
      - uses: actions/checkout@v3
      - uses: actions/download-artifact@v3
        with:
          name: dist-and-coverage-artifacts
          path: coverage
      - name: Display structure of downloaded files
        run: ls -R
      - uses: codecov/codecov-action@v3
        with:
          directory: ./coverage/coverage
          flags: unittests # optional
          name: codecov-umbrella # optional
          fail_ci_if_error: true # optional (default = false)
          verbose: true # optional (default = false)
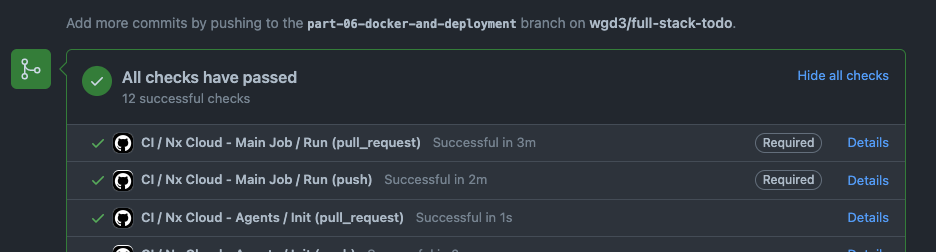
For the sake of space I won't add the other workflows here, but you can see the other two files here. After pushing these workflow files to my repository, I was able to see output from these tasks in my PR immediately:
Later I added an additional package that aids in building Docker images in the pipeline. It's a little redundant to have both this and the docker-build target in our application's project.json files, and I hope to optimize this soon.
Note: Before running these commands I backed up my existing Dockerfiles because the generators add their own. Just a word of caution!
$ npm i -D @nx-tools/nx-container @nx-tools/container-metadata

# add 'container' run targets to each app's project.json
$ npx nx g @nx-tools:nx-container:init client
$ npx nx g @nx-tools:nx-container:init server
When the docker-build job runs in GitHub Actions, I use a configuration defined in project.json to automatically tag and label the new images before pushing to ghcr.io:
      "configurations": {
        "ci": {
          "metadata": {
            "images": [
              "ghcr.io/wgd3/fst-server"
            ],
            "load": true,
            "push": true,
            "cache-from": [
              "type=gha"
            ],
            "cache-to": [
              "type=gha,mode=max"
            ],
            "tags": [
              "type=ref,event=branch",
              "type=ref,event=tag",
              "type=sha",
              "type=sha,format=long",
              "latest"
            ]
          }
},Git Hooks
When I first started running my GitHub Actions, everything failed (surprise, that screenshot above was not from my first attempt!). I got this lovely error constantly:
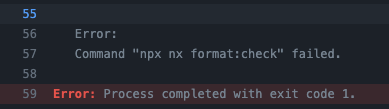
There was a simple solution: run nx format:write before every commit! But that's tedious, easy to forget, and I knew about a tool that could handle this for me. Git hooks allow developers to run commands at key points in the git lifecycle. To fix the above issue, I needed a pre-commit hook to run formatting automatically. Knowing that I was going to use a handful of hooks, I chose to let Husky manage them for me. Husky offers a small package that makes setting up and modifying hook very simple, and I used it for linting and formatting:
# install Husky
$ npx husky-init && npm install

# create empty hooks
$ npx husky add .husky/commit-msg ''
$ npx husky add .husky/prepare-commit-msg ''
I'm going to introduce a few additional tools that will also be used in our git hooks: lint-staged, commitlint, and commitizen.
# install lint-staged
$ npm i -D lint-staged

# install commitlint and helper
npm install -D @commitlint/config-nx-scopes @commitlint/cli @commitlint/config-conventional

# install commitizen
npm i -D commitizen @commitlint/cz-commitlint
Back to the pre-commit hook - let's automate linting and formatting. You'll notice a new .husky directory with a few files in it, here's the pre-commit one:
#!/bin/sh
. "$(dirname "$0")/_/husky.sh"

npx lint-stagedlint-staged gives us the ability to run commands on our staged files, depending on the file type or directory location. This repository currently lints affected apps/libs, and then runs nx format:write on the whole repository!
module.exports = {
  '{apps,libs}/**/*.{ts,js,html,json,scss,css,md}': [
    'nx affected:lint --uncommitted --fix true',
  ],
  '*.{ts,js,html,json,scss,css,md,yaml,yml}': [
    'nx format:write --base=main --head=HEAD',
  ],
};
The other tools that were added pertain to commit messages - by standardizing the format of commit messages, we can use a changelog generator to auto-populate CHANGELOG.md in our CI/CD workflow!
#!/bin/sh
. "$(dirname "$0")/_/husky.sh"

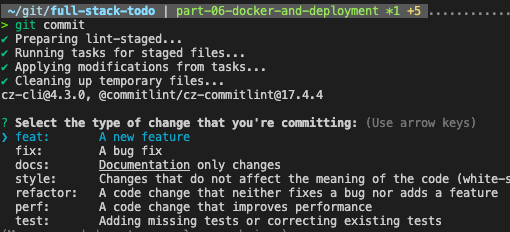
(exec < /dev/tty && node_modules/.bin/cz --hook) || true < /dev/nullThis hook launches an interactive prompt that handles commit formatting for me:
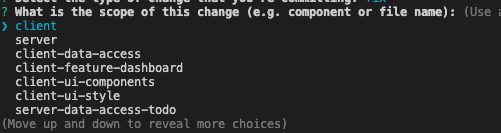
To manage the "scope" portion of the commit message, I used the @commitlint/config-nx-scopes package to specify which libs/apps (as well as custom repo and k8s values) are affected by a commit.
git commit I'd be greeted by an error message telling me I didn't know how to use git commands properly. This was attributed to the --hook flag, and there are some more details in the Speed Bumps section. Summary
That was.. a lot. And there are plenty of rabbit holes one could go down for any particular topic in this post. But I hope it provided some insight into how applications are managed and deployed, as well as how "integration" is utilized in GitHub repositories.
Some of what I dicussed here was new to me. I'm a passionate user of Gitlab, which has an entirely different CI/CD system (which I believe to be much easier than Github Actions), and I had never deployed anything on Render before. This is to say: there are many possibilities out there, and I hope to keep documenting on this blog as I find them. Don't hesitate to sign up and leave a comment if there's something in particular you'd like covered!
As always, the code for this post can be found in the repository at a specific tag: wgd3/full-stack-todo@part-06
Edits:
- The use of codecov.io was/is a great idea. However, for PRs, we only run tests on the libs that have been changed. As such, the report that gets pushed to codecov.io misrepresents the coverage for the project as a whole. I'm going to continue using the workflow in it's current form, but I wanted to make sure people were aware!
Speed Bumps
- Massive oversight - completed column was set to
datetimeinstead ofboolean. This has been corrected in the previous post and code base - When creating manifests for Kubernetes, I attempted to rename the
Servicecomponents by appending-svcto all of them. I found out quickly that this broke everything.. Thenginx.conffile in theclientimage uses a redirect for all/apiHTTP calls to an "upstream" namedserver. There is a way to use environmentals in an nginx config file, but I haven't gotten there yet. Additionally, I learned that when pods are created there are environmental variables set that I was unaware of. For instance, in theserverpod, there were variables such asMARIADB_SERVICE_HOSTandMARIADB_SERVICE_PORTwhich reflected the IP and port of themariadbservice. Whenmariadbwas renamed tomariadb-svcthose environment variable names changed, which broke the environmental-based config used in the MariaDB deployment manifest. - Issues with
cz --hooktook me to this GitHub issue.