Full Stack Development Series Part 9: User Authentication and JWT Support in Angular
Learn how to add JWT support to your Angular-based web app! Part of our full-stack software project series.

As you know, user authentication is a crucial aspect of any web application, and in our previous blog posts, we added it to the backend API. However, to ensure complete security, we also need to add authentication and authorization to the frontend using JSON Web Tokens (JWTs). In this post, we'll guide you through the process of adding JWT support to your Angular-based web app, enabling you to create a secure and efficient full-stack software project. So, let's get started!
If you'd like to skip ahead to the code for this post, check it out here: wgd3/full-stack-todo@part-09
Goals
- Create a login page
- Handle login/logout functionality
- Create a user registration page
Create A Login Page
Following the pattern of "feature modules," our first step is to use the Nx generator for a new login feature:
$ npx nx generate @nrwl/angular:library FeatureLogin \
--directory=libs/client \
--changeDetection=OnPush \
--importPath=@fst/client/feature-login \
--skipModule \
--standalone \
--style=scss \
--tags=type:feature,scope:client
We'll be using Storybook to design this page, so next let's add Storybook support to the library:
$ npx nx generate @nrwl/angular:storybook-configuration client-feature-login \
--tsConfiguration \
--configureTestRunner
The last bit of configuration is in the library's project.json where the build-storybook target gets updated to utilize our style library:
"build-storybook": {
"executor": "@storybook/angular:build-storybook",
"outputs": ["{options.outputDir}"],
"options": {
"outputDir": "dist/storybook/client-feature-login",
"configDir": "libs/client/feature-login/.storybook",
"browserTarget": "client-feature-login:build-storybook",
"compodoc": false,
"styles": ["apps/client/src/styles.scss"],
"stylePreprocessorOptions": {
"includePaths": ["libs/client/ui-style/src/lib/scss"]
}
},
"configurations": {
"ci": {
"quiet": true
}
}
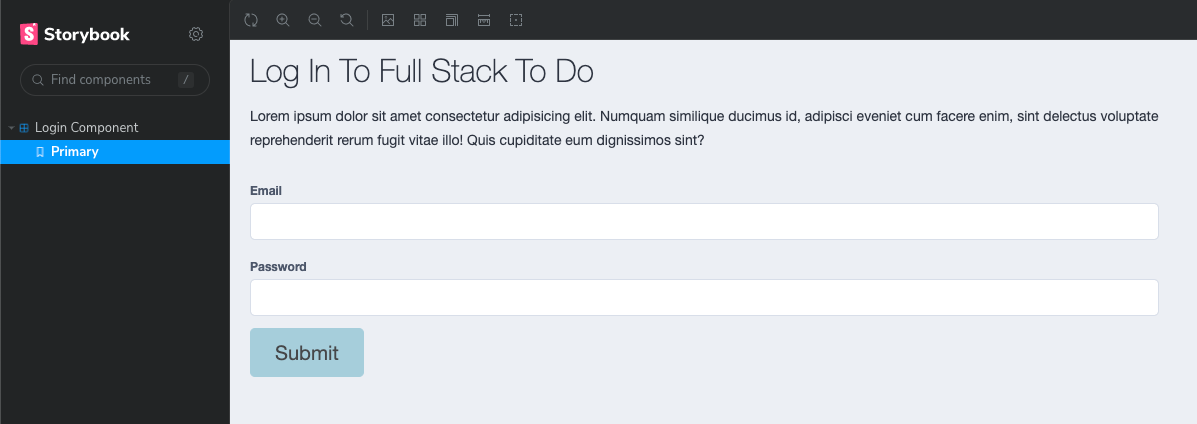
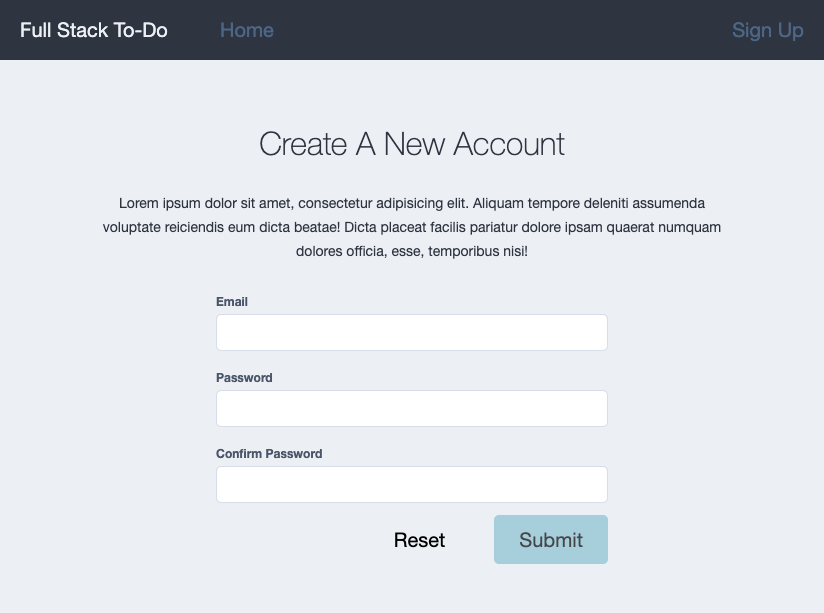
},After the library is configured and files are in place, we can use some basic placeholder code to start designing. You'll notice that this HTML does not contain anything Angular-specific. That is intentional, as we're going with a design-first approach to this page.
<div class="login__container">
  <div class="login__header">
    <h1>Login To Full Stack To Do</h1>
  </div>

  <div class="login__text">
    <p>
      Lorem ipsum dolor sit amet consectetur adipisicing elit. Numquam similique
      ducimus id, adipisci eveniet cum facere enim, sint delectus voluptate
      reprehenderit rerum fugit vitae illo! Quis cupiditate eum dignissimos
      sint?
    </p>
  </div>

  <div class="login__form-container">
    <form>
      <div class="input-group">
        <label class="form-label">Email</label>
        <input type="email" class="form-control" />
      </div>

      <div class="input-group">
        <label class="form-label">Password</label>
        <input type="password" class="form-control" />
      </div>

              <button type="submit" class="btn btn--primary">Submit</button>

    </form>
  </div>
</div>
I made a small change to the story for this component to make visualization a little easier:
  title: 'Login Component',
  component: ClientFeatureLoginComponent,
  decorators: [
    componentWrapperDecorator(
      (s) => `
      <div style="width: 50vw; height: 100vh">${s}</div>
    `
    ),
  ],
Initially, this template doesn't look too bad! Thanks to our CSS classes from the style library, we don't need to add much other than some layout styles.
Handling JWTs and User API Calls
In order for the login page to be functional, we need to create a service to interact with the backend and generate JWTs. We should also create a User service to get information about a user.
# create user service
$ npx nx generate @schematics/angular:service User \
--project=client-data-access \
--path=libs/client/data-access/src/lib

# then create JWT/Auth service
$ npx nx generate @schematics/angular:service Auth \
--project=client-data-access \
--path=libs/client/data-access/src/lib

# add a utility library to hold client-wide constants
$ npx nx generate @nrwl/node:library util \
--directory=libs/client/ \
--importPath=@fst/client/util \
--strict \
--tags=type:util,scope:client \
--unitTestRunner=none

# install jwt-decode so we can read tokens on the client side
$ npm i jwt-decode
I'm going to illustrate a way to store any received tokens on the client side, however you should be aware that this is a somewhat controversial topic. Check out this article for more information: LocalStorage vs Cookies.
We're going to need a key to reference when storing tokens; let's add a constant to our new utility library:
export const TOKEN_STORAGE_KEY = 'fst-token-storage';
ApiService to TodoService. It was clear that this service was used only for To-do API calls, and I didn't want a name like ApiService to obfuscate that. The authentication service we made has a few specific responsibilities: handle/store JWTs and make the HTTP API calls for logging in users. You can see below how when a JWT is received it is both stored in LocalStorage and in a BehaviorSubject. The reason it goes to LocalStorage is so that when a user refreshes the page, or closes the window and returns later, the JWT can be retrieved without forcing the user to log in again.
@Injectable({
  providedIn: 'root',
})
export class AuthService {
  private readonly http = inject(HttpClient);
  private readonly baseUrl = environment.apiUrl;

  private accessToken$$ = new BehaviorSubject<string | null>(null);
  private userData$$ = new BehaviorSubject<IAccessTokenPayload | null>(null);

  /**
   * The encoded token is stored so that it can be used by an interceptor
   * and injected as a header
   */
  accessToken$ = this.accessToken$$.pipe();

  /**
   * Data from the decoded JWT including a user's ID and email address
   */
  userData$ = this.userData$$.pipe();

  setToken(val: string) {
    this.accessToken$$.next(val);
    localStorage.setItem(TOKEN_STORAGE_KEY, val);
  }

  clearToken() {
    this.accessToken$$.next(null);
    localStorage.removeItem(TOKEN_STORAGE_KEY);
  }

  loadToken() {
    console.log(`JwtTokenService#loadToken`);
    const token = localStorage.getItem(TOKEN_STORAGE_KEY);
    console.log(`JwtTokenService#loadToken - token: ${token}`);
    if (token) {
      this.accessToken$$.next(token);
    }
  }

  loginUser(data: ILoginPayload): Observable<ITokenResponse> {
    return this.http
      .post<ITokenResponse>(`${this.baseUrl}/auth/login`, data)
      .pipe(
        tap(({ access_token }) => {
          this.setToken(access_token);
          this.userData$$.next(this.decodeToken(access_token));
        })
      );
  }

  logoutUser() {
    this.clearToken();
    this.userData$$.next(null);
  }

  /**
   * Compares the `exp` field of a token to the current time. Returns
   * a boolean with a 5 sec grace period.
   */
  isTokenExpired(): boolean {
    const expiryTime = this.userData$$.value?.['exp'];
    if (expiryTime) {
      return 1000 * +expiryTime - new Date().getTime() < 5000;
    }
    return false;
  }

  private decodeToken(token: string | null): IAccessTokenPayload | null {
    if (token) {
      return jwt_decode.default(token) as IAccessTokenPayload;
    }
    return null;
  }
}Next we're going to add an Interceptor which will be responsible for adding the JWT to each outgoing API request. You could manually add the Authorization header to each HTTP request in the various services, but that results in repeated code and services that rely on each other.
$ npx nx generate @schematics/angular:interceptor Jwt \
--project=client-data-access \
--functional \
--path=libs/client/data-access/src/lib/interceptors
This interceptor will not be class-based service (as was the convention for some time) - it's going to be a simple function!
# functional interceptor, instead of class/service-based
export const jwtInterceptor: HttpInterceptorFn = (req, next) => {
  const authService = inject(AuthService);
  return authService.accessToken$.pipe(
    map((token) => {
      if (token) {
        req = req.clone({
          url: req.url,
          setHeaders: {
            Authorization: `Bearer ${token}`,
          },
        });
      }
      return req;
    }),
    switchMap((req) => next(req))
  );
};Our interceptor needs to be provided to HttpClient during application bootstrap:
bootstrapApplication(AppComponent, {
  providers: [
    provideRouter(appRoutes, withEnabledBlockingInitialNavigation()),
    provideHttpClient(withInterceptors([jwtInterceptor])),
  ],
}).catch((err) => console.error(err));Lastly, with the entire authorization infrastructure in place, we can use a Guard to prevent access to certain pages:
$ npx nx generate @schematics/angular:guard Auth \
--project=client-data-access \
--functional \
--path=libs/client/data-access/src/lib/guards
export const authGuard: CanActivateFn = (route, state) => {
const authService = inject(AuthService);
const router = inject(Router);
const expired = authService.isTokenExpired();
console.log(`[authGuard] canActivate: ${expired}`);
if (expired) {
router.navigate([`/login`], { queryParams: { returnUrl: state.url } });
return false;
}
return true;
};To apply the guard to the dashboard, update the application's routes:
export const clientFeatureDashboardRoutes: Route[] = [
  { path: '', component: FeatureDashboardComponent, canActivate: [authGuard] },
];Make The Login Page Functional
With our template in place and styles applied we can move onto making the component functional! This component will utilize a FormGroup to create a strongly-typed, reactive form and handle validation.
type LoginFormType = {
  email: FormControl<string>;
  password: FormControl<string>;
};

@Component({
  selector: 'full-stack-todo-client-feature-login',
  standalone: true,
  imports: [CommonModule, FormsModule, ReactiveFormsModule, RouterModule],
  templateUrl: './client-feature-login.component.html',
  styleUrls: ['./client-feature-login.component.scss'],
  changeDetection: ChangeDetectionStrategy.OnPush,
})
export class ClientFeatureLoginComponent {

  loginForm = new FormGroup<LoginFormType>({
    email: new FormControl<string>('', {
      nonNullable: true,
      validators: [Validators.required, Validators.email],
    }),
    password: new FormControl<string>('', {
      nonNullable: true,
      validators: [Validators.required],
    }),
  });
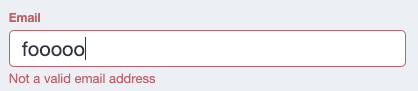
}Reactive forms have excellent support for validation criteria, and is separate from any HTML attributes that may be specified in a template. Since we have made both form fields required, let's link the FormGroup to the template and add some validation styles:
.input-group {
  position: relative;
  width: 100%;
  margin-block-end: $space-sm;

  label,
  .label {
    margin-block-end: $space-x-sm;
    font-weight: bold;
  }

  // 'invalid' is conditionally added to input groups so that
  // child elements can have matching styles
  &--invalid {
    color: $nord11;

    label,
    .label {
      color: $nord11;
    }
  }

  // new class with modifiers, hidden by default
  .validation-text {
    font-size: 0.65rem;
    display: none;

    &--visible {
      display: block;
    }

    &--error {
      color: $nord11;
    }

    &--warning {
      color: $nord13;
    }
  }
} <div
class="input-group"
[class.input-group--invalid]="emailInvalidAndTouched"
>
<label class="label" for="email-input" id="email-label">Email</label>
<input
type="email"
class="form-control"
formControlName="email"
autocomplete="email"
id="email-input"
aria-labelledby="email-label"
/>
<small
class="validation-text validation-text--error"
[class.validation-text--visible]="
fEmail.hasError('email') && fEmail.touched
"
>Not a valid email address</small
>
<small
class="validation-text validation-text--error"
[class.validation-text--visible]="
fEmail.hasError('required') && fEmail.touched
"
>Email address is required</small
>
</div> get emailInvalidAndTouched(): boolean {
return (
this.loginForm.controls.email.invalid &&
this.loginForm.controls.email.touched
);
}
get fEmail(): FormControl {
return this.loginForm.controls.email as FormControl;
}
Now when a user successfully logs in we can use Angular's router to automatically load the user's dashboard:
  submitForm() {
    if (this.loginForm.valid && this.loginForm.dirty) {
      const { email, password } = this.loginForm.getRawValue();
      this.authService
        .loginUser({ email, password })
        .pipe(take(1))
        .subscribe({
          next: () => {
            this.router.navigate(['/']);
          },
          error: (err) => {
            console.error(err);
          },
        });
    }
  }
Handling Login Errors
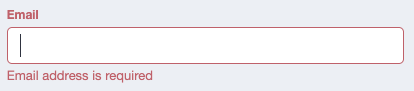
Separate from our client-side form validation is the error handling of HTTP responses. If a user enters the wrong password, or the user doesn't exist, we need to provide visual feedback that there was an error.
I chose to use a BehaviorSubject in the component to store this message if the need arises:
errorMessage$ = new BehaviorSubject<string | null>(null);The submitForm method was also updated with error-handling code:
  submitForm() {
    if (this.loginForm.valid && this.loginForm.dirty) {
      this.errorMessage$.next(null);
      const { email, password } = this.loginForm.getRawValue();
      this.authService
        .loginUser({ email, password })
        .pipe()
        .subscribe({
          next: () => {
            console.log(`User authenticated, redirecting to dashboard...`);
            this.router.navigate(['/']);
          },
          error: (err) => {
            if (err instanceof HttpErrorResponse) {
              this.errorMessage$.next(err.error.message);
            } else {
              this.errorMessage$.next(
                `Unknown error occurred while logging in!`
              );
            }
            console.error(err);
          },
        });
    }
}On the template side, we add a paragraph element with an ngIf directive to conditionally render this message:
      <p class="error-text" *ngIf="errorMessage$ | async as err">{{ err }}</p>

      <button
        type="submit"
        class="btn btn--primary"
        [class.btn--disabled]="loginForm.invalid"
        (click)="submitForm()"
      >
        Submit
      </button>
Adding Logout Functionality
Our users can now log in! That's excellent, but now there needs to be a way to handle logging out. Since our header is a logical place for a "Log Out" link, and the header is part of the AppComponent, let's add a simple logout() method and wire it up to the template:
export class AppComponent {
  readonly authService = inject(AuthService);
  readonly router = inject(Router);

  user$ = this.authService.userData$;

  logout() {
    this.authService.logoutUser();
    this.router.navigate([`/login`]);
  }
}<div class="header__actions">
<ng-container *ngIf="user$ | async as user; else login">
<span class="nav-link">Hello, {{ user.email }}!</span>
<span class="nav-link" (click)="logout()">Log Out</span>
</ng-container>
<ng-template #login>
<a href="#" class="nav-link" [routerLink]="['/login']">Log In</a>
</ng-template>
</div>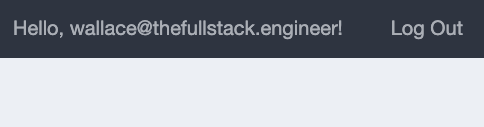
User's browser storage will no longer have the JWT and they will be immediately redirected to the login page.
Adding A Register Page
Last but not least is the registration page - we want users to be able to use the application! We're going to follow the same steps as the login page: create a new feature library, add Storybook support, and add supoprt for our style library:
$ npx nx generate @nrwl/angular:library FeatureRegister \
--directory=libs/client \
--routing \
--changeDetection=OnPush \
--flat \
--importPath=@fst/client/feature-register \
--simpleName \
--skipModule \
--standalone \
--style=scss \
--tags=type:feature,scope:client
Add storybook support for design
$ npx nx generate @nrwl/angular:storybook-configuration client-feature-register --configureTestRunnerbuild-storybook run target in the new library!At this point I copied the template code from the login page for the registration template as a starting point. After adding some layout styles and adjusting for the different form, I ended up with this:
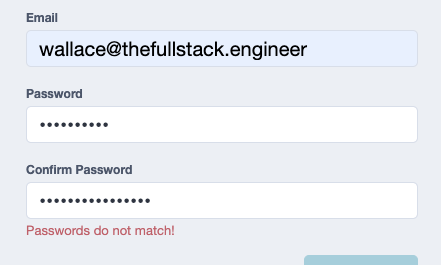
Everything is functionally the same as the login form - with one small exception I wanted to cover. Custom form validators!
import {
  AbstractControl,
  FormGroup,
  ValidationErrors,
  ValidatorFn,
} from '@angular/forms';

export const MATCHING_ERROR_KEY = 'passwordsMatch';

export const MatchingPasswords = (
  controlName: string,
  matchingControlName: string
): ValidatorFn => {
  return (fg: AbstractControl): ValidationErrors | null => {
    if (!(fg instanceof FormGroup)) {
      throw new Error(
        `Can not use MatchingPasswords validator on a control that is not a FormGroup!`
      );
    }

    const passwordControl = fg.controls[controlName];
    const matchingControl = fg.controls[matchingControlName];

    if (!passwordControl.touched && !matchingControl.touched) {
      return null;
    }
    if (passwordControl.value !== matchingControl.value) {
      return { [MATCHING_ERROR_KEY]: true };
    }
    return null;
  };
};
We could use the FormGroup's observable valueChanges to dynamically compare the values of the two password fields or... use the reactive form's built-in support for custom validation rules. The above validator gets passed the name of 2 FormControl objects, compares their values, and if they don't match, returns a ValidationErrors object.
Summary
Our Angular app now supports JWT authentication, providing your users a secure and efficient experience. By following this guide, you have learned how to implement end-to-end authentication across both of these applications. As always, you can check out the source code for this project on my GitHub repository: wgd3/full-stack-todo@part-09
Stay tuned for our next post in this series, where we'll dive deeper into developing the application's features. Thanks for reading, and happy coding!
Speed Bumps
- Strange double API call on login.
JwtInterceptorwas watching changes toaccessToken$so every time it was triggered a request would be duplicated! Troubleshooting: canceled request was coming from line 39 of authservice, which just callednext()on the accessToken$. Looked for all references to that observable, found theJwtInterceptorref, fixed by addingtake(1)
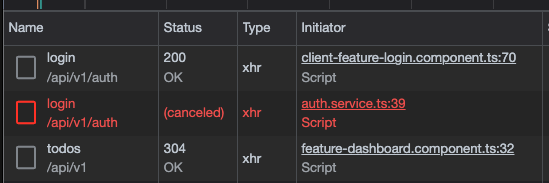
304 Not Modifiedresponses - just indicates nothing's changed! https://wanago.io/2022/01/17/api-nestjs-etag-cache/- Angular test coverage was complaining that constructors were not being covered by tests. Turns out
emitDecoratorMetadatais no longer required, but moving to injectables also solves the issue. https://github.com/nrwl/nx/issues/12132#issuecomment-1268408588