Full Stack Development Series Part 10: State Management in Angular with Libraries and the Facade Pattern
Explore state management libraries (NgRx, Elf, RxJs) & the facade pattern to streamline Angular development. Advantages, disadvantages, & more.
In the ever-evolving world of web application development, managing state efficiently is crucial to delivering a smooth user experience. In this blog post, we will explore the use of state management libraries and the facade pattern in Angular web applications. I will provide an overview of the available state management libraries, discussing their advantages and disadvantages. By the end of this article, you'll have a solid understanding of how to leverage these tools to streamline your Angular development process.
Other posts in this series:
- An Introduction
- Part 1: Getting Started With Nx, Angular, and NestJS
- Part 2: Creating a REST API
- Part 3: Connecting Angular to a REST API
- Part 4: Data Persistence with TypeORM and NestJS
- Part 5: Design Systems and Angular Component Development with Storybook
- Part 6: Application Deployment and CI/CD
- Part 7: Unit and Integration Testing
- Part 8: User Authentication and JWT Support in NestJS
- Part 9: User Authentication and JWT Support in Angular
If you want to skip ahead to the code, you can checkout out the repository: wgd3/full-stack-todo@part-10
What Is State Management?
Think of a state management system as the brain behind the to-do list app. Each task has a status (completed or pending) and other details like the task description and title. As you add, complete, or update tasks, the app needs to keep track of these changes and reflect them accurately. That's where a state management library comes in - a centralized system that acts as a source of truth for data and enables true responsiveness throughout the app.
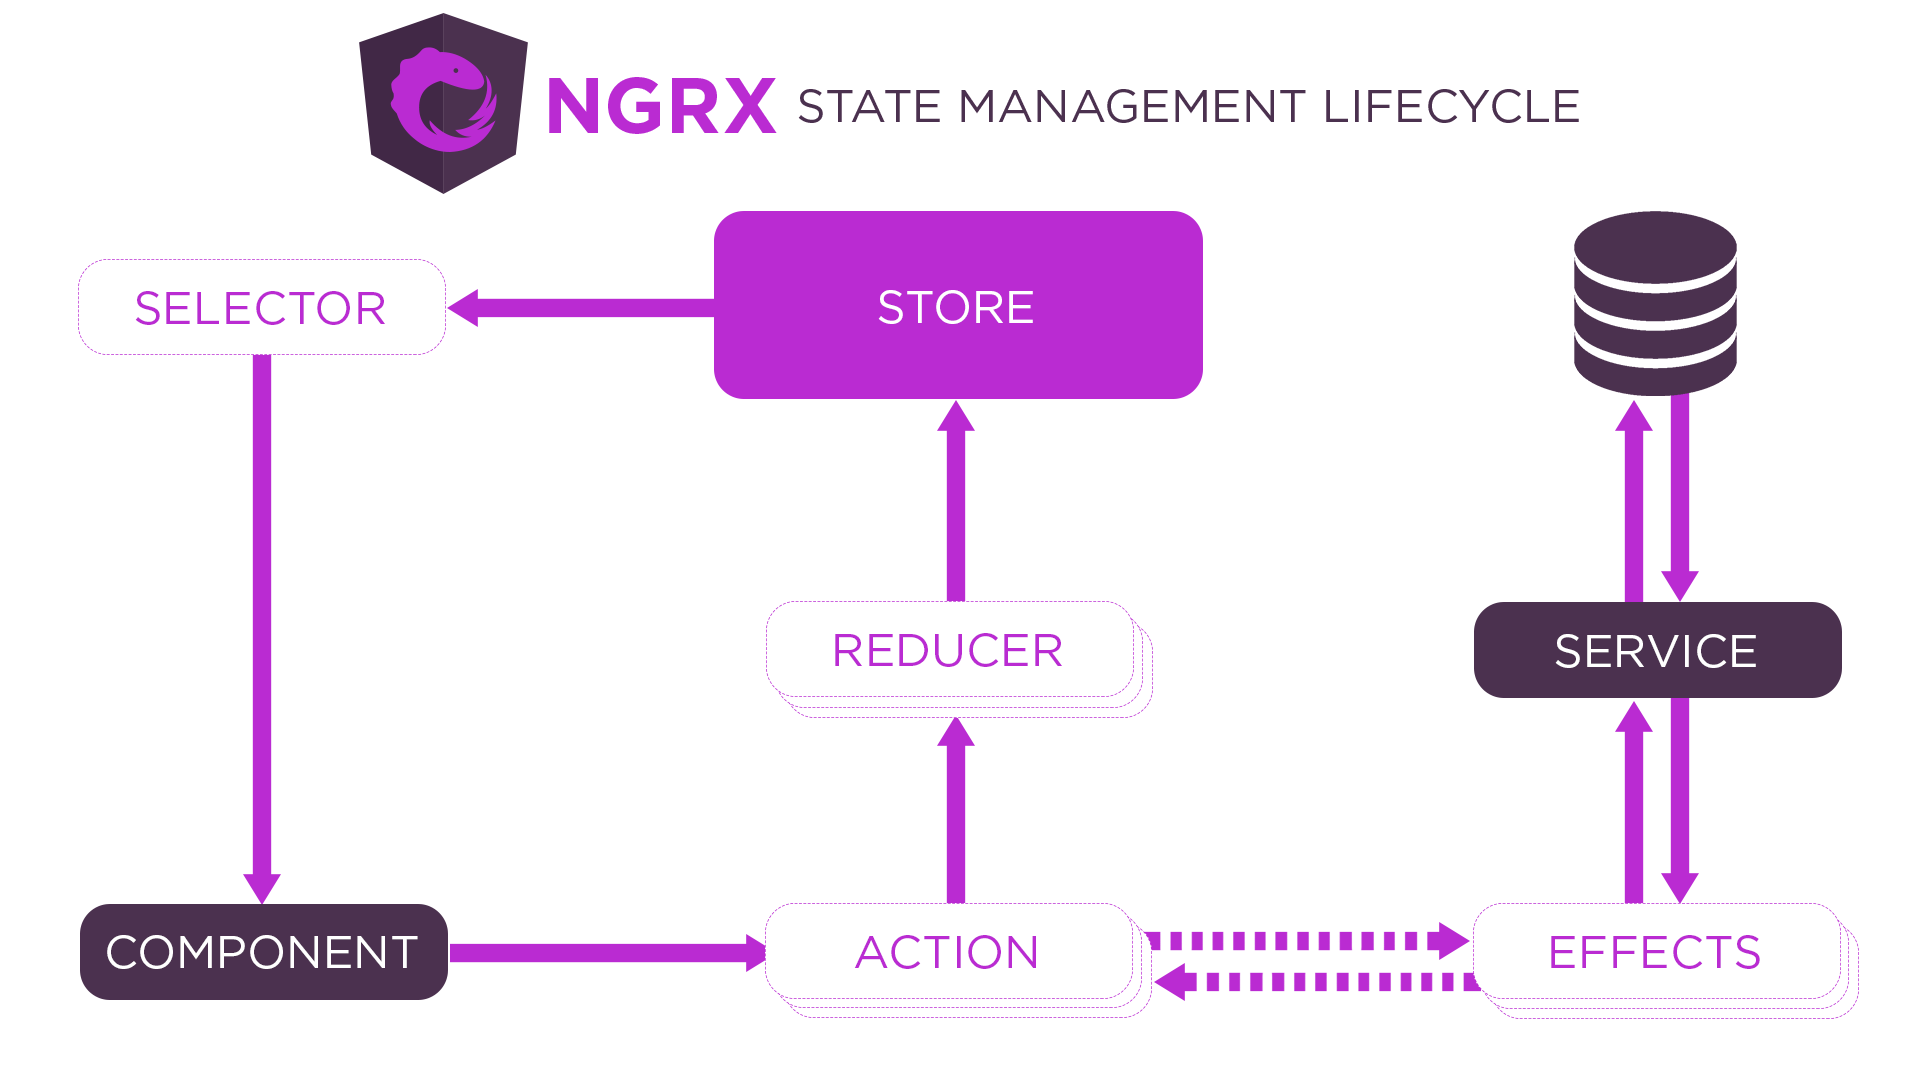
Generally speaking, the common components of a state management system are:
- Store - the sole location for data to be stored and referenced, usually stored in memory
- State - the data structure that resides in the store, sometimes implemented as immutable objects
- Reducer/Repository - the component responsible for interacting with the Store and updating its data. Either called programmatically, or set up to react to events
- Effects (optional) - a function that runs when changes occur, but does not happen within the flow of the store-reducer loop. Can interact with a reducer/repository to update data.
- Actions (optional) - Instead of directly calling methods on a reducer/repository, "actions" can be dispatched to a central stream, and observers of that stream can react to the action.
Disclaimer: Necessity Over Novelty
This is a simple to-do application, and there is no need for a state management library to be included. As a small, stateless web application, we can contain all the application logic within components and services easily. This post and the associated code are purely for demonstration purposes. I would urge any developer to really consider the pros and cons before integrating a third-party library into their codebase.
Creating The Facade
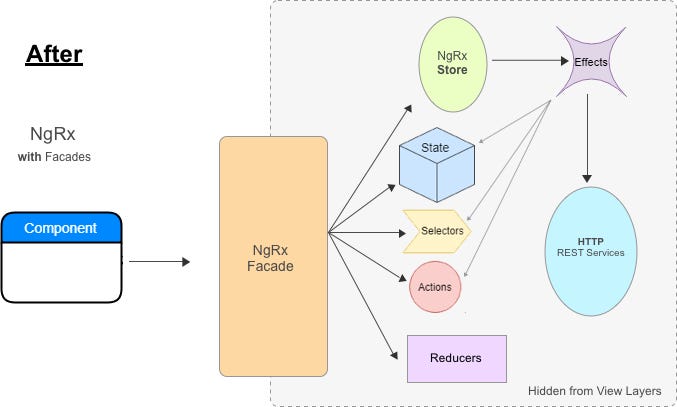
Before diving into the available libraries or their implementations, I wanted to start by introducing the concept of a "facade." As an application grows, your components rely on many services to coordinate, introducing code complexity. By creating a facade over the state management library, you can encapsulate the underlying implementation details and present a cleaner interface to the components. This abstraction allows for easier maintenance, reduces coupling, and improves the overall modularity of your Angular application.
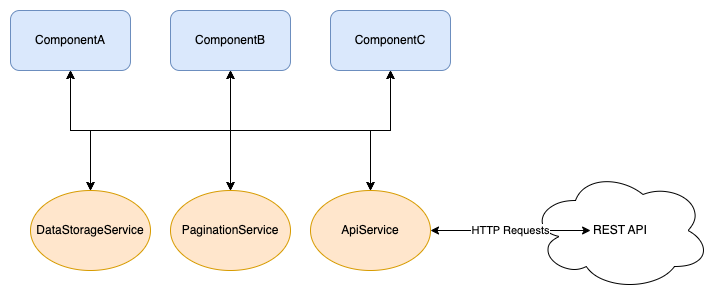
This is where a facade becomes useful: creating a single entry point for application coordination. Facades are standard Angular services that abstract more complex functionality away from components.
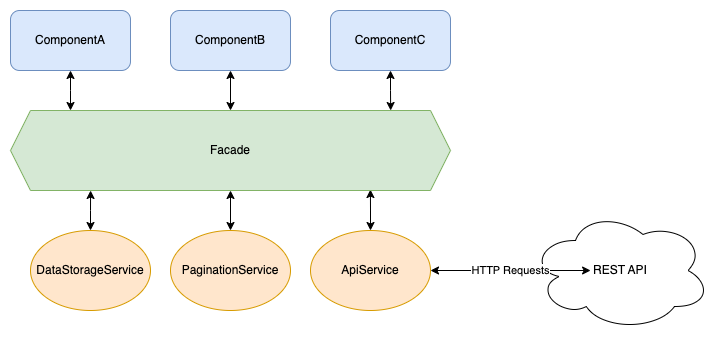
Another benefit of a facade layer is that data sources are now entirely arbitrary. Much like the shared libraries in our repository, the facade layer provides strongly-typed interfaces to various data sources. In practice, as long as the data structures are the same, we could switch out the HTTP calls to our own backend with calls to dummyjson.com, and no other part of the application would be affected. Or switch from storing to-do objects in memory to localStorage, again without any impact on consumers.
Refactoring The Header
This is unimportant, but I wanted to point out before moving on that I moved the header HTML into its dedicated component in the ui-components library. I did this to inject the TodoFacade into the dashboard and the header and demonstrate how reactive components can utilize the same data source.
The header now has a counter next to the Home link, which indicates how many incomplete to-do items you have. Whenever a to-do gets marked complete, or an incomplete to-do is deleted, the header number will automatically update! I realize this isn't the most pretty UI, but I wanted something quick and easy to demonstrate.
Let's finally create the facade! I used the standard nx generate @schematics/angular:service generator to produce this file. The generator automatically appends Service to the class and file names, which I removed to reduce confusion.
@Injectable({
  providedIn: 'root',
})
export class TodoFacade {
  private readonly todoService = inject(TodoService);

  private todos$$ = new BehaviorSubject<ITodo[]>([]);
  todos$ = this.todos$$.asObservable();

  loadTodos() {
    this.todoService.getAllToDoItems().subscribe({
      next: (todos) => {
        this.todos$$.next(todos);
      },
    });
  }
}Our data source is a simple BehaviorSubject, which gets updated by calling loadTodos(). Any component using the facade can call loadTodos() in a "fire and forget"-fashion - components will react to changes in todos$.
Now we get to use the TodoFacade in our dashboard component! I left commented out code in this block to illustrate the differences and reduction in code.
  // private readonly apiService = inject(TodoService);
  private readonly todoFacade = inject(TodoFacade);

  // todos$ = new BehaviorSubject<ITodo[]>([]);
  todos$ = this.todoFacade.todos$;


  refreshItems() {
    // this.apiService
    //   .getAllToDoItems()
    //   .pipe(take(1))
    //   .subscribe((items) => this.todos$.next(items));
    this.todoFacade.loadTodos();
  }

  toggleComplete(todo: ITodo) {
    // this.apiService
    //   .updateToDo(todo.id, { completed: !todo.completed })
    //   .pipe(take(1))
    //   .subscribe(() => {
    //     this.refreshItems();
    //   });
    this.todoFacade.updateTodo(todo.id, { completed: !todo.completed });
  }

  deleteTodo({ id }: ITodo) {
    // this.apiService
    //   .deleteToDo(id)
    //   .pipe(take(1))
    //   .subscribe(() => {
    //     this.refreshItems();
    //   });
this.todoFacade.deleteTodo(id);That's it! We have successfully abstracted the data store and API calls away from the dashboard component. With the "single pane of glass" in place, we can start experimenting with state management libraries and plug them into the facade.
Introducing NgRx
I'll admit to being biased here. I've used NgRx for years now and love it. It adds a large amount of code to any project, but I've started viewing that as a positive. Angular itself is highly opinionated, which means any Angular developer can jump into almost any Angular project and already knows where to find certain things: how code is organized and how everything works together. The same goes for NgRx - I could write an extensive state management system with it, abandon the project, and another NgRx developer could dive right in using the same conventions.
Getting NgRx Installed
With both NgRx and Nx having released v16, my normal set up process changed. I wanted to embrace the functional providers now available, and utilize a data-access library for the code, but the generators available didn't quite seem to cover that use case (or I just missed something). So I fumbled my way through this process.
First step was importing the functional providers into app.config.ts for the client application:
export const appConfig: ApplicationConfig = {
  providers: [
    provideEffects(),
    provideStore(),
    ...
  ]
  ...
}
This initializes the root store and root effects for the whole application. We can now integrate NgRx into the data access library:
npx nx generate @nx/angular:ngrx todos \
--parent=libs/client/data-access/src/lib/state/ngrx \
--barrels \
--directory=../state/ngrx \
--no-minimal \
--skipImport
Quirks With This Generator Command
This command is what worked for me at the time. I'm not sure why I had to specify a higher directory or skip importing this feature state, but this command resulted in the files being generated in the location I wanted.
I also specifically answered "no" when prompted for a facade, as we've already created one that we'll continue to use.
You'll have a handful of new files now:
libs/client/data-access/src/lib/state/ngrx
├── index.ts
├── todos.actions.ts
├── todos.effects.spec.ts
├── todos.effects.ts
├── todos.models.ts
├── todos.reducer.spec.ts
├── todos.reducer.ts
├── todos.selectors.spec.ts
└── todos.selectors.ts
Since the generated code is using the Entity pattern from NgRx, they included a models file for a shared data structure. I updated that file to point to our existing data structure:
import { ITodo } from '@fst/shared/domain';

export type TodoEntity = ITodo;
Migrating To Functional Effects
NgRx added support for "functional" effects recently, which means easier testing and no more classes! Here's a before and after of our init$ effect that was automatically generated:
@Injectable()
export class TodoEffects {
  private actions$ = inject(Actions);

  init$ = createEffect(() =>
    this.actions$.pipe(
      ofType(TodosActions.initTodos),
      switchMap(() => of(TodosActions.loadTodosSuccess({ todos: [] }))),
      catchError((error) => {
        console.error('Error', error);
        return of(TodosActions.loadTodosFailure({ error }));
      })
    )
  );
}
Updated:
export const loadTodos = createEffect(
  (actions$ = inject(Actions), todoService = inject(TodoService)) => {
    return actions$.pipe(
      ofType(TodosActions.initTodos),
      switchMap(() =>
        todoService.getAllToDoItems().pipe(
          map((todos) => TodosActions.loadTodosSuccess({ todos })),
          catchError((error) => {
            console.error('Error', error);
            return of(TodosActions.loadTodosFailure({ error }));
          })
        )
      )
    );
  },
  { functional: true }
);
I highly recommend reading their docs pertaining to functional effects if you decide to embrace this pattern.
The effects for creating, updated, and deleting to-do entities look very similar to the above - wait for the corresponding action to get dispatched, call the TodoService, and dispatch an effect based on success or failure.
Updating The Facade
We're now replacing our home-grown state management (nothing more than a simple BehaviorSubject) with the NgRx Store!
  // private readonly todoService = inject(TodoService);
  private readonly store = inject(Store)

  // private todos$$ = new BehaviorSubject<ITodo[]>([]);
  // todos$ = this.todos$$.asObservable();
  todos$ = this.store.select(TodoSelectors.selectAllTodos);

  loadTodos() {
    // this.todoService.getAllToDoItems().subscribe({
    //   next: (todos) => {
    //     this.todos$$.next(todos);
    //   },
    // });
    this.store.dispatch(TodoActions.initTodos());
}initTodos() is a simple Action getting dispatched without any properties, which makes the conversion fairly straightforward. The updateTodo() method has parameters however, and they need to be passed to the Action getting dispatched to the Store. NgRx v15 introduced the createActionGroup function, which I enjoy using for grouping together API request flows:
const errorProps = props<{ error: string; data?: unknown }>;

export const updateTodo = createActionGroup({
  source: `Todo API`,
  events: {
    update: props<{ todoId: string; data: IUpdateTodo }>(),
    updateSuccess: props<ITodo>(),
    updateFailure: errorProps(),
  },
});These start/succeed/fail groups will become prevalent throughout this library, so I created the errorProps constant that can be reused throughout all action groups. Keeps things standardized :D
updateTodo(todoId: string, data: IUpdateTodo) {
  // this.todoService.updateToDo(todoId, todoData).subscribe({
  //   next: (todo) => {
  //     const current = this.todos$$.value;
  //     // update the single to-do in place instead of
  //     // requesting _all_ todos again
  //     this.todos$$.next([
  //       ...current.map((td) => (td.id === todo.id ? todo : td)),
  //     ]);
  //   },
  // });
  this.store.dispatch(
    TodoActions.updateTodo.update({ todoId, data })
  );
}The above pattern is replicated for the remaining create and delete API flows:
export const createTodo = createActionGroup({
  source: `Todo API`,
  events: {
    create: props<{ data: ICreateTodo }>(),
    createSuccess: props<ITodo>(),
    createFailure: errorProps(),
  },
});

export const deleteTodo = createActionGroup({
  source: `Todo API`,
  events: {
    delete: props<{ todoId: string }>(),
    // 👇 nothing is returned by the API, but we need
    // to tell the entity adaptor which todo was deleted
    deleteSuccess: props<{ todoId: string }>(),
    deleteFailure: errorProps(),
  },
});Updating the reducer, there are some patterns I've used for awhile to make code easier to read. Namely, I create groups of on() methods to keep things organized:
const crudSuccessOns: ReducerTypes<TodosState, ActionCreator[]>[] = [
  on(
    TodosActions.createTodo.createSuccess,
    (state, { todo }): TodosState => todosAdapter.addOne(todo, { ...state })
  ),
  on(
    TodosActions.updateTodo.updateSuccess,
    (state, { update }): TodosState =>
      todosAdapter.updateOne(update, { ...state })
  ),
  on(
    TodosActions.deleteTodo.deleteSuccess,
    (state, { todoId }): TodosState =>
      todosAdapter.removeOne(todoId, { ...state })
  ),
  on(
    TodosActions.loadTodosSuccess,
    (state, { todos }): TodosState =>
      todosAdapter.setAll(todos, { ...state, loaded: true })
  ),
];

const reducer = createReducer(
  initialTodosState,
  on(
    TodosActions.initTodos,
    (state): TodosState => ({
      ...state,
      loaded: false,
      error: null,
    })
  ),
  on(
    // utilize an overload for the on() method that
    // allows for multiple actions to trigger the same
    // state change 👇
    TodosActions.loadTodosFailure,
    TodosActions.createTodo.createFailure,
    (state, { error }): TodosState => ({ ...state, error })
  ),
  ...crudSuccessOns
);
As I mentioned earlier, NgRx produces a fair amount of code, so I didn't want to copy and paste everything into this post. You can of course explore the repository for the complete code, I hope this was enough to get started!
Using Elf
The next library we'll explore comes from the @ngneat team, Elf. Marketed as a (mostly) framework-agnostic state management system, Elf has a smaller footprint than NgRx and some first-party support for features such as HTTP request monitoring, pagination, and state persistence. This was my first adventure with Elf and I walked away very impressed.
Installing Elf
Nx does not currently offer Elf-focused code generators, but Elf has their own CLI that can be used to get started:
npx @ngneat/elf-cli installYou'll be presented with a ton of additional, optional packages, and for this project I selected everything that wasn't React-specific.
Updating The Facade
I've mentioned easy plug-and-play style code changes to support various libraries, so here's how the facade was updated to utilize Elf instead of NgRx:
  // private readonly ngrxStore = inject(Store);
  private readonly elfRepository = inject(ElfTodosRepository);
  private readonly todoService = inject(TodoService);

  // todos$ = this.store.select(TodoSelectors.selectAllTodos);
  todos$ = this.elfRepository.todos$.pipe(
    map(({ data }) => data)
  );
  // loaded$ = this.ngrxStore.select(TodoSelectors.selectTodosLoaded);
  loaded$ = this.elfRepository.todos$.pipe(map(({ isSuccess }) => isSuccess));
  // error$ = this.ngrxStore.select(TodoSelectors.selectTodosError);
  error$ = this.elfRepository.todos$.pipe(
    filterError(),
    map(({ error }) => error)
  );

  loadTodos() {
    // this.store.dispatch(TodoActions.initTodos());
    this.todoService
      .getAllToDoItems()
      .pipe(tap(this.elfRepository.loadTodos), trackRequestResult(['todos']))
      .subscribe();
}I commented out code that wasn't being used to ensure we could see a side-by-side. The "repository" that is referenced in the facade resides in a new file:
const store = createStore(
  { name: 'todos' },
  withEntities<ITodo>(),
  withRequestsStatus()
);

@Injectable({ providedIn: 'root' })
export class TodosRepository {
  todos$ = store.pipe(selectAllEntities(), joinRequestResult(['todos']));

  addTodo(data: ITodo) {
    store.update(addEntities(data));
  }

  loadTodos(todos: ITodo[]) {
    store.update(addEntities(todos));
  }

  updateTodo(todo: ITodo) {
    store.update(updateEntities(todo.id, { ...todo }));
  }

  deleteTodo(todoId: string) {
    store.update(deleteEntities(todoId));
  }
}The repository isn't really necessary here, as according to their own documentation this kind of code could live in a facade. It felt odd directly calling the ToDoService from the facade, so I integrated @ngneat/effects with Elf, and cut down on the code within the facade:
  loadTodos() {
    // this.store.dispatch(TodoActions.initTodos());
    dispatch(loadTodos());
  }

  updateTodo(todoId: string, data: IUpdateTodo) {
    // this.ngrxStore.dispatch(TodoActions.updateTodo.update({ todoId, data }));
    dispatch(updateTodo({ todoId, data }));
  }

  createTodo(todo: ICreateTodo) {
    // this.ngrxStore.dispatch(TodoActions.createTodo.create({ data }));
    dispatch(createTodo({ todo }));
  }

  deleteTodo(todoId: string) {
    // this.ngrxStore.dispatch(TodoActions.deleteTodo.delete({ todoId }));
    dispatch(deleteTodo({ todoId }));
}The effects file looks very similar to NgRx's class-based effects:
  loadTodosEffect$ = createEffect((actions$: Observable<Action>) => {
    return actions$.pipe(
      // ofType shares the operator name with NgRx, so watch your
      // imports! They both share the same purpose, but are not
      // interchangeable between libraries
      ofType(loadTodos),
      tap(() => console.log(`loading todos for elf`)),
      switchMap(() =>
        this.todoService
          .getAllToDoItems()
          .pipe(map((todos) => this.repo.loadTodos(todos)))
      )
    );
  });
Actions and Effects
Continuing the similarities, actions are almost identical:
export const todoActions = actionsFactory('todo');

export const loadTodos = todoActions.create('Load Todos');
export const createTodo = todoActions.create(
  'Add Todo',
  props<{ todo: ICreateTodo }>()
);
The only thing that tripped me up while integrating actions and effects is that, by default, effects do not emit actions once processed. In the above loadTodosEffect$ you can see the Elf repository being directly called after a successful HTTP request instead of dispatching a loadTodosSuccess action.
It really was as simple as the above to integrate Elf and change state management libraries. Given that some of this code did not need to reside in separate files, the additional code to use Elf is significantly less than NgRx.
Making State Management Actually Plug-and-Play
Throughout the development of this post, I had a nagging feeling that I could more clearly demonstrate the use of different state management systems. Continuing to update the TodoFacade by commenting out library-specific code was becoming ugly, and even worse - a ton of tests broke! I decided that to more elegantly implement this system, I would rely on the following:
- Splitting out the single facade into library-specific facades
- Use a facade interface to define the common properties and methods
- Use an
InjectionTokento dynamically inject a specific state management system
Here's what I came up with:
export interface ITodoFacade {
  // easy access to the todo entities, loading status, and any
  // error message
  todos$: Observable<ITodo[]>;
  loaded$: Observable<boolean>;
  error$: Observable<string | null | undefined>;

  // standard CRUD methods, utilizing todo interfaces from
  // the shared domain library
  loadTodos: () => void;
  updateTodo: (todoId: string, data: IUpdateTodo) => void;
  createTodo: (todo: ICreateTodo) => void;
  deleteTodo: (todoId: string) => void;
}
// strongly type the InjectionToken by defining which facades
// can be used
export type TodoFacadeProviderType = TodoNgRxFacade | TodoElfFacade;
// Default the to NgRx system if not specified
export const TODO_FACADE_PROVIDER = new InjectionToken<TodoFacadeProviderType>(
'Specify the facade to be used for state management',
{
factory() {
const defaultFacade = inject(TodoNgRxFacade);
return defaultFacade;
},
}
);export const appConfig: ApplicationConfig = {
providers: [
...
{
provide: TODO_FACADE_PROVIDER,
useClass: TodoNgRxFacade,
//useClass: TodoElfFacade,
},
],
};I removed the singular TodoFacade in the data access library, and added library-specific facade files to the respective ngrx and elf folders.
I also added a console.log statement as part of each facade's loadTodos method, which printed the name of the state management system in use. Let me tell you, it was so cool to see that I could switch the useClass statements, save the file, and see the app recompile with an entirely different subsystem. This pattern of using the InjectionToken meant that in my test suites, which had been written while integrating NgRx, I could specify the NgRx facade and not worry about implementing mock Elf stores and selectors in each suite.
Summary
State management is a complex aspect of web application development, and choosing the right tools and patterns can significantly enhance productivity and maintainability. NgRx and Elf are among the popular state management libraries available for Angular, each with advantages and disadvantages. NgRx provides a robust solution but demands a learning curve and more boilerplate code. Elf prioritizes simplicity and developer ergonomics. Additionally, leveraging the facade pattern can further simplify the integration of state management libraries into Angular applications.
As always, you can checkout out the the code for this post on GitHub: wgd3/full-stack-todo@part-10
References
